
Why Getting Your Setup Right Matters More Than You Think
Setting up a hookah for the first time can feel genuinely intimidating – there are a number of parts that all need to fit together properly, and if even one thing is slightly off, you end up with thin smoke, harsh flavour, or worst of all, that horrible burning taste that puts beginners off hookah entirely. I still remember my first attempt back in about 2015 – I had this cheap little hookah I'd picked up from a market stall, no instructions, no clue what I was doing, and I spent a good twenty minutes trying to work out which end of the stem went into the base. The session was awful, naturally, but I was hooked on the idea of getting it right.
The good news is that once you understand the basics, setting up a hookah is genuinely straightforward – and after you've done it three or four times, it becomes second nature. Every single component has a specific job, and when they're all working together properly, you get thick clouds, clean flavour, and a session that lasts well over an hour without any fuss.
What Comes in the Box and How Does It All Fit Together?
Whether you've bought a budget starter hookah or something more premium, you're going to find roughly the same core parts – the base (that's your glass vase at the bottom), the stem (the tall metal shaft that sits on top), a hose with a handle and mouthpiece, a bowl that sits at the very top, a tray that catches ash, and usually a set of rubber grommets to seal everything together. Some hookahs come with tongs and a wind cover as well, but those aren't always included.
Assembly is bottom-up. Start by placing the stem into the base – there should be a rubber grommet that creates an airtight seal between the two. This seal is absolutely critical. If air is leaking in around the stem, you'll struggle to draw smoke through properly and the whole session suffers. Give the stem a gentle twist as you push it in, and once it's seated, try pulling it – it should feel snug and firm. Next, attach your hose to the hose port on the side of the stem (again, there's usually a grommet here), place the ash tray on top of the stem, and you're essentially assembled.
If any of the grommets feel loose or you can hear air hissing when you draw, you've got a leak. Some people wrap a small strip of damp paper towel around the joint to temporarily fix a poor seal – it works in a pinch, but ideally you want grommets that fit properly.
How Much Water Should You Put in the Base?
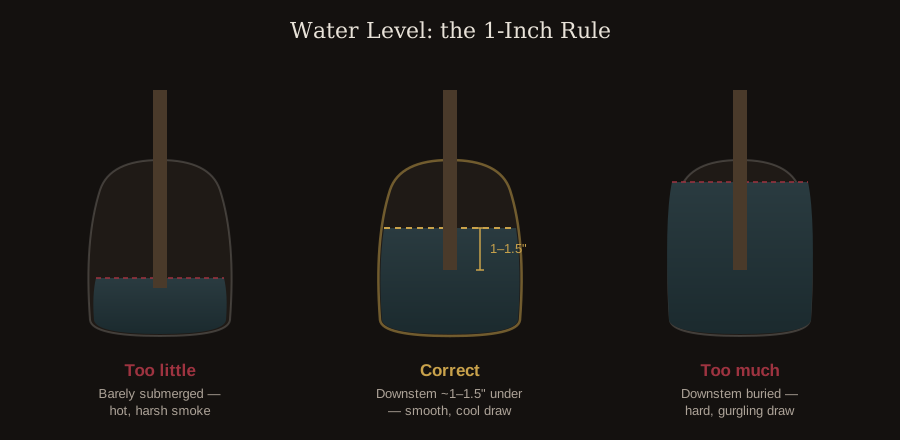
This is where a surprising number of people go wrong, and I'll be honest – I overfilled mine for months before someone pointed it out. The general rule is simple: fill the base so that the bottom of the downstem (the metal tube that extends down from the shaft) is submerged by roughly 2.5 to 4 centimetres of water. That's it. Not halfway up the base, not three-quarters – just enough to cover the bottom of the stem.
Too much water and you'll find it incredibly hard to draw – you're essentially trying to pull air through a wall of water, and it's exhausting. Too little water and the smoke doesn't get filtered or cooled properly, which makes it harsh on your throat. Some people like to add ice to the water for a cooler draw, which is perfectly fine and something I'd actually recommend during summer sessions – it makes a noticeable difference to the smoothness.
How Do You Pack the Bowl Properly?
Bowl packing is genuinely the single biggest factor in how your session turns out – get this wrong and nothing else matters. The approach depends slightly on what type of tobacco you're using, but for most blonde leaf shisha (which is what the vast majority of beginners start with), you want a fluffy pack. That means taking your shisha, breaking it apart with your fingers so it's loose and airy, and sprinkling it into the bowl until it sits just below the rim – roughly 2 millimetres below the top edge.
You do not want to press it down or pack it tightly. The idea is that air needs to flow through the tobacco for it to heat evenly – if it's compressed, the airflow gets choked off and you end up with hot spots that burn the top layer while the bottom stays untouched. I've seen people absolutely stuff their bowls to the brim and wonder why the flavour tastes like charcoal after five minutes.
If you're using a phunnel bowl (which I'd strongly recommend for beginners – more on bowl types in our other guide), make sure the shisha isn't blocking the central spire hole. That hole is your airflow path, and if tobacco falls into it or gets packed over it, you'll get almost no smoke at all.
Foil or Heat Management Device – Which Should You Use?
Traditional setup uses aluminium foil stretched tightly over the top of the bowl, with small holes poked through it using a toothpick or a foil poker. You want the foil drum-tight – if it's sagging in the middle, it'll touch the tobacco directly and cause burning. I usually double up on the foil (two layers of standard kitchen foil) and poke around 15 to 20 small holes in a circular pattern, keeping the centre relatively clear if I'm using a phunnel bowl.
Heat Management Devices (HMDs) like the Kaloud Lotus are, in my opinion, a far better option – especially for anyone who doesn't want to fuss about with foil every session. An HMD sits directly on top of the bowl, you place your coals inside it, and it regulates the heat distribution for you. They're more forgiving, they produce more consistent sessions, and they save you the hassle of poking holes. The only downside is cost – a decent HMD runs about 15 to 30 quid – but it's a worthwhile investment that pays for itself in better sessions almost immediately.
How Do You Light the Charcoal Correctly?
This is non-negotiable: use natural coconut charcoal, not quick-light discs. Quick-lights are convenient because they ignite with a standard lighter, but they contain chemical accelerants that you can taste in the smoke – it's an unpleasant metallic flavour that ruins otherwise good shisha. Natural coals take longer to light (you need a coil burner or a gas stove – a standard lighter won't cut it) but the difference in session quality is enormous.
Place two or three cubes of natural charcoal on your burner and let them heat for about 8 to 12 minutes, flipping them halfway through. You want them fully lit – that means covered in a light grey ash on all sides with a glowing orange core. If you put half-lit coals on your bowl, you'll get that same chemical taste and potentially a headache from the carbon monoxide they give off while still igniting.
Once they're ready, use your tongs to place them on the foil or inside your HMD. For foil, start with the coals near the edges of the bowl rather than dead centre – this prevents the middle of the tobacco from scorching. For an HMD, just drop them in, close the lid about halfway, and let the bowl warm up for three to five minutes before you start drawing.
What About Those First Draws?
Patience is everything here. After placing your coals, give the bowl a few minutes to come up to temperature – if you start pulling hard immediately, you'll likely get thin wispy smoke and not much flavour. Take slow, gentle draws at first. You should start to see the smoke thicken gradually over the first couple of minutes, and by the five-minute mark you should be getting full, flavourful clouds.
If the smoke tastes harsh or burnt, you've got too much heat – remove one coal or open your HMD lid further to let some heat escape. If there's barely any smoke at all, you might need to add another coal or check your seals for air leaks. Heat management is an ongoing process throughout the session, not a set-and-forget thing. You'll likely need to rotate or ash your coals every 15 to 20 minutes, and you might remove one coal partway through as the tobacco gets more sensitive to heat.
A well-packed, well-managed session should give you anywhere from 45 minutes to over an hour of solid smoking. Once the flavour starts to drop off and the smoke thins out noticeably, that's your tobacco telling you it's done – don't try to squeeze more out of it by adding fresh coals, because all you'll get is a burnt, unpleasant taste. Just empty the bowl, give everything a rinse, and set up fresh for the next round.
New to hookah? Start with our complete beginner's guide to hookah.